MUSIC CAREER ADVICE
How to Make a Stage Plot and Input List for Your Band

Ozan

Sep 14, 2026

The venue has confirmed your show and asked for a stage plot and input list. You know what your band takes to a gig, but putting it on paper raises a few questions. Does the bass amp need its own line? Where do the monitors go? Which way is stage left?
This guide walks through a four-piece band's stage plot and an input-list table you can copy into your own document. A second drawing shows what changes when the singer adds a keyboard. If you're still looking for a booking, our guide to getting gigs as a musician covers that process.
TL;DR
-
Draw the people and equipment as viewed from above, with the audience edge clearly marked.
-
Give each audio input a number and use the same labels on the drawing and input list.
-
Identify monitor mixes separately, and say who needs to hear what.
-
Confirm what your band brings and what you need the venue to supply.
-
Send a dated version in the venue's requested format, and keep any technical summary on your website or EPK consistent with it.
Table of contents
What are a stage plot and an input list?
A stage plot is a drawing of where performers, instruments and equipment sit on stage. An input list identifies each audio source that needs a connection to the sound system. Together, they tell the venue where to place equipment, what needs plugging in and which technical details to confirm before arrival.
Your EPK holds the music and publicity material people use to assess and promote your act. Our guide to what to include in an EPK covers those assets. The documents below describe the setup for the performance.
A stage plot and input list example for a four-piece band
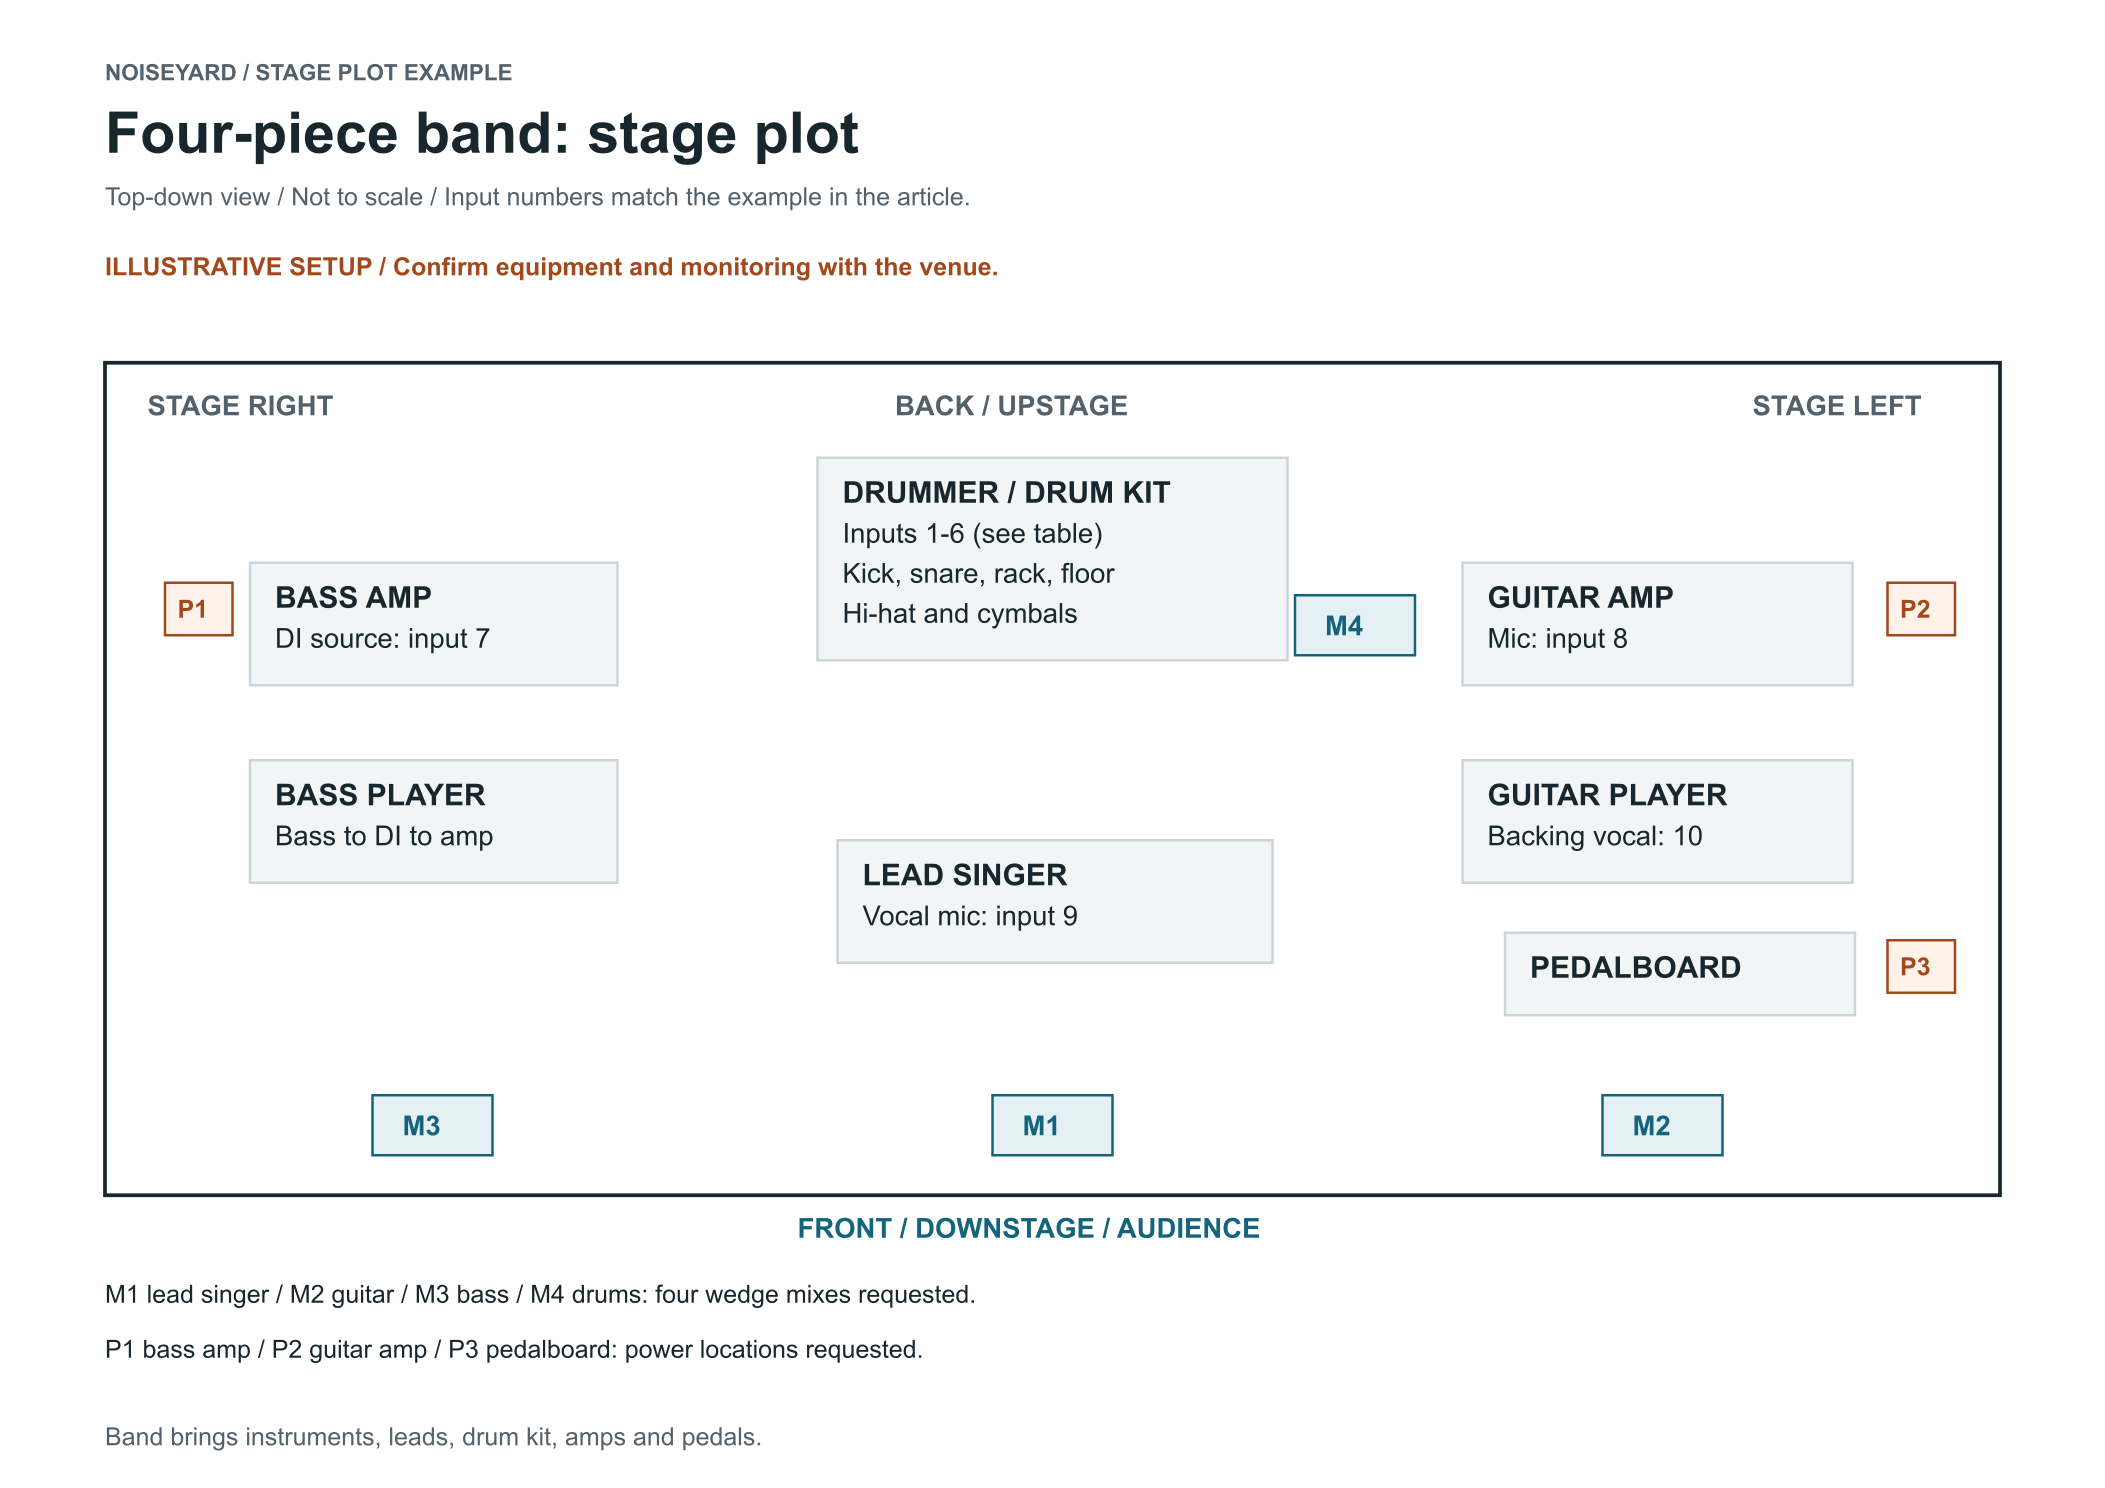
This illustrative setup has a lead singer, a guitarist who sings backing vocals, a bassist and a drummer. The band brings its instruments, drum kit, amplifiers, guitar pedalboard and instrument leads. It requests microphones, stands, a bass DI, XLR cables, a PA and four monitor mixes from the venue. Those requests still need confirmation.
The drawing puts the drummer at the back, the bassist on the left of the page, the guitarist on the right and the lead singer at the front. The audience is along the bottom edge. It shows relative positions; it is not drawn to scale.
The matching input list
This example uses ten inputs. Six are for the drums, one for bass, one for the guitar amp and two for vocals. The overhead microphones cover sound from above the drum kit, including cymbals. Here, their L/R labels follow the audience's view; make your own labelling convention clear.
| Input | Source | Connection requested | Stand requested |
|---|---|---|---|
| 1 | Kick | Kick microphone | Short boom |
| 2 | Snare | Instrument microphone | Short boom / clip |
| 3 | Rack tom | Instrument microphone | Clip / boom |
| 4 | Floor tom | Instrument microphone | Clip / boom |
| 5 | Overhead L | Overhead microphone | Tall boom |
| 6 | Overhead R | Overhead microphone | Tall boom |
| 7 | Bass | DI before bass amp | None |
| 8 | Guitar amp | Instrument microphone | Short boom |
| 9 | Lead vocal | Vocal microphone | Tall boom |
| 10 | Guitar backing vocal | Vocal microphone | Tall boom |
A DI box provides a suitable connection from an instrument to the venue's audio system. In this example, the bass reaches the desk through the DI while a separate through connection feeds the bass amp. The amp helps the bassist hear on stage; it has no additional microphone in this list.
Ten inputs is the choice for this example. Your room, instruments and arrangement may call for a different setup. Agree microphone types, stand options and the final channel assignment with the engineer.
Start your own version
Copy the table above into a document or spreadsheet. Replace the sources with your band's setup, add any missing inputs and remove unused rows. Keep the columns wide enough to read each entry.
Use these fields above both your drawing and input list:
Artist: [band name]
Show: [venue and performance date]
Lineup / version: [for example, four-piece with keys]
Updated: [date you last changed the setup]
Technical contact: [name and email or phone]
Below the input list, add your monitor requests and two equipment notes: Band brings and Venue requested. Record who confirmed the venue's equipment and when. The following sections show what belongs in each note.
Draw your band's stage plot
Mark the audience, then place the performers
Draw a rectangle for the stage. Label the edge nearest the audience as front or downstage, and the back as upstage. Stage left and stage right follow the performer's view while facing the audience. In our drawing, stage left is on the right-hand side of the page.
Use labelled boxes for people and equipment. Put amps behind or beside the players where you intend to use them, and show the drum kit, vocal positions and pedalboards. You can add names to help the crew identify people when you arrive.
Leave room for people to move between the equipment. If the venue asks for dimensions, give measured requirements and check them against the available space. A drawing marked “not to scale” cannot establish that the setup will fit.
Show microphones, monitors and power locations
Label vocal microphones and instrument connections with the numbers from your input list. A group label such as “Drums, inputs 1–6” can refer to the detailed drum entries on the accompanying sheet. If something needs a specific position, mark it individually.
The blue M labels in the example identify monitor mixes. A floor monitor, often called a wedge, lets a performer hear sound directed back towards them. The band requests M1 for the lead singer, M2 for guitar, M3 for bass and M4 for drums.

Photo by Sumeet Ahire on Unsplash
Below the input table, write the sources each person most needs in their mix. For this example, the requests are:
-
M1, lead singer: lead vocal and guitar.
-
M2, guitarist: backing vocal and lead vocal.
-
M3, bassist: lead vocal and guitar.
-
M4, drummer: lead vocal, guitar and bass.
These are starting requests to discuss and adjust at soundcheck. Four physical wedges do not necessarily mean four independently controlled mixes, so check what the venue can provide.
If you use in-ear monitors, describe your system and what you bring. Tell the engineer about any feeds you need from them. A floor-monitor symbol alone would give them incomplete information.
The P labels mark requested power locations: P1 for the bass amp, P2 for the guitar amp and P3 for the pedalboard. List the equipment needing power and have the venue confirm provision. Keep monitor labels and power labels separate from audio-input numbers.
Agree who supplies each item
Write down what travels with the band and what you are requesting from the venue. Include stands, DI boxes and cables, as well as the larger equipment. NLfx Professional's stage-plot guidance includes a supplier column in its input-list example for this purpose.
You can add a “Supplier / status” column to your own list, or put the supply notes beneath it. Use descriptions such as “Band brings,” “Venue requested” or “Venue confirmed” so a request cannot be mistaken for an agreement.
For a shared drum kit, confirm which parts are provided and which the drummer must bring. If extra hire changes what the show costs you, settle who pays before confirming it. Our music and show pricing guide covers working out your performance fee.
Get our new guides by email

Write an input list that matches the drawing
Work through the sound sources in your live setup. The example's four musicians use ten inputs because several microphones cover the drum kit and the guitarist also sings. Count the connections required for the show, including vocals, instruments and any playback you use.
Give each entry a source name, a proposed number and the connection needed. “Guitar amp microphone” tells the engineer how that guitar reaches the desk. If you use an amp modeller instead, describe its outputs and agree how they will connect.
Use the same numbers and names on both documents. Yamaha's live-sound guide recommends matching the microphone and DI numbers on the stage plot to the input list. Check the pair whenever you add, remove or rename a source.
A house engineer may adapt your proposed numbering to an existing setup, especially on a bill with several acts. Confirm the final arrangement with them. Keep your own documents consistent so the source they are discussing is identifiable.
For unfamiliar equipment, record the make, model and output labels and ask how to list it. If the venue's form asks for a detail you cannot verify, mark it for confirmation. This is particularly useful for stereo instruments, electronic drums or playback devices with several outputs.
Update both documents when the setup changes
Suppose the lead singer starts playing a keyboard. There are still four performers, but the audio and power requirements have changed.
In this version, the keyboard uses separate left and right outputs through two DI channels. The original ten inputs stay in place, and the list adds:
-
11: Keys L, DI from the keyboard's left output, no mic stand.
-
12: Keys R, DI from the keyboard's right output, no mic stand.
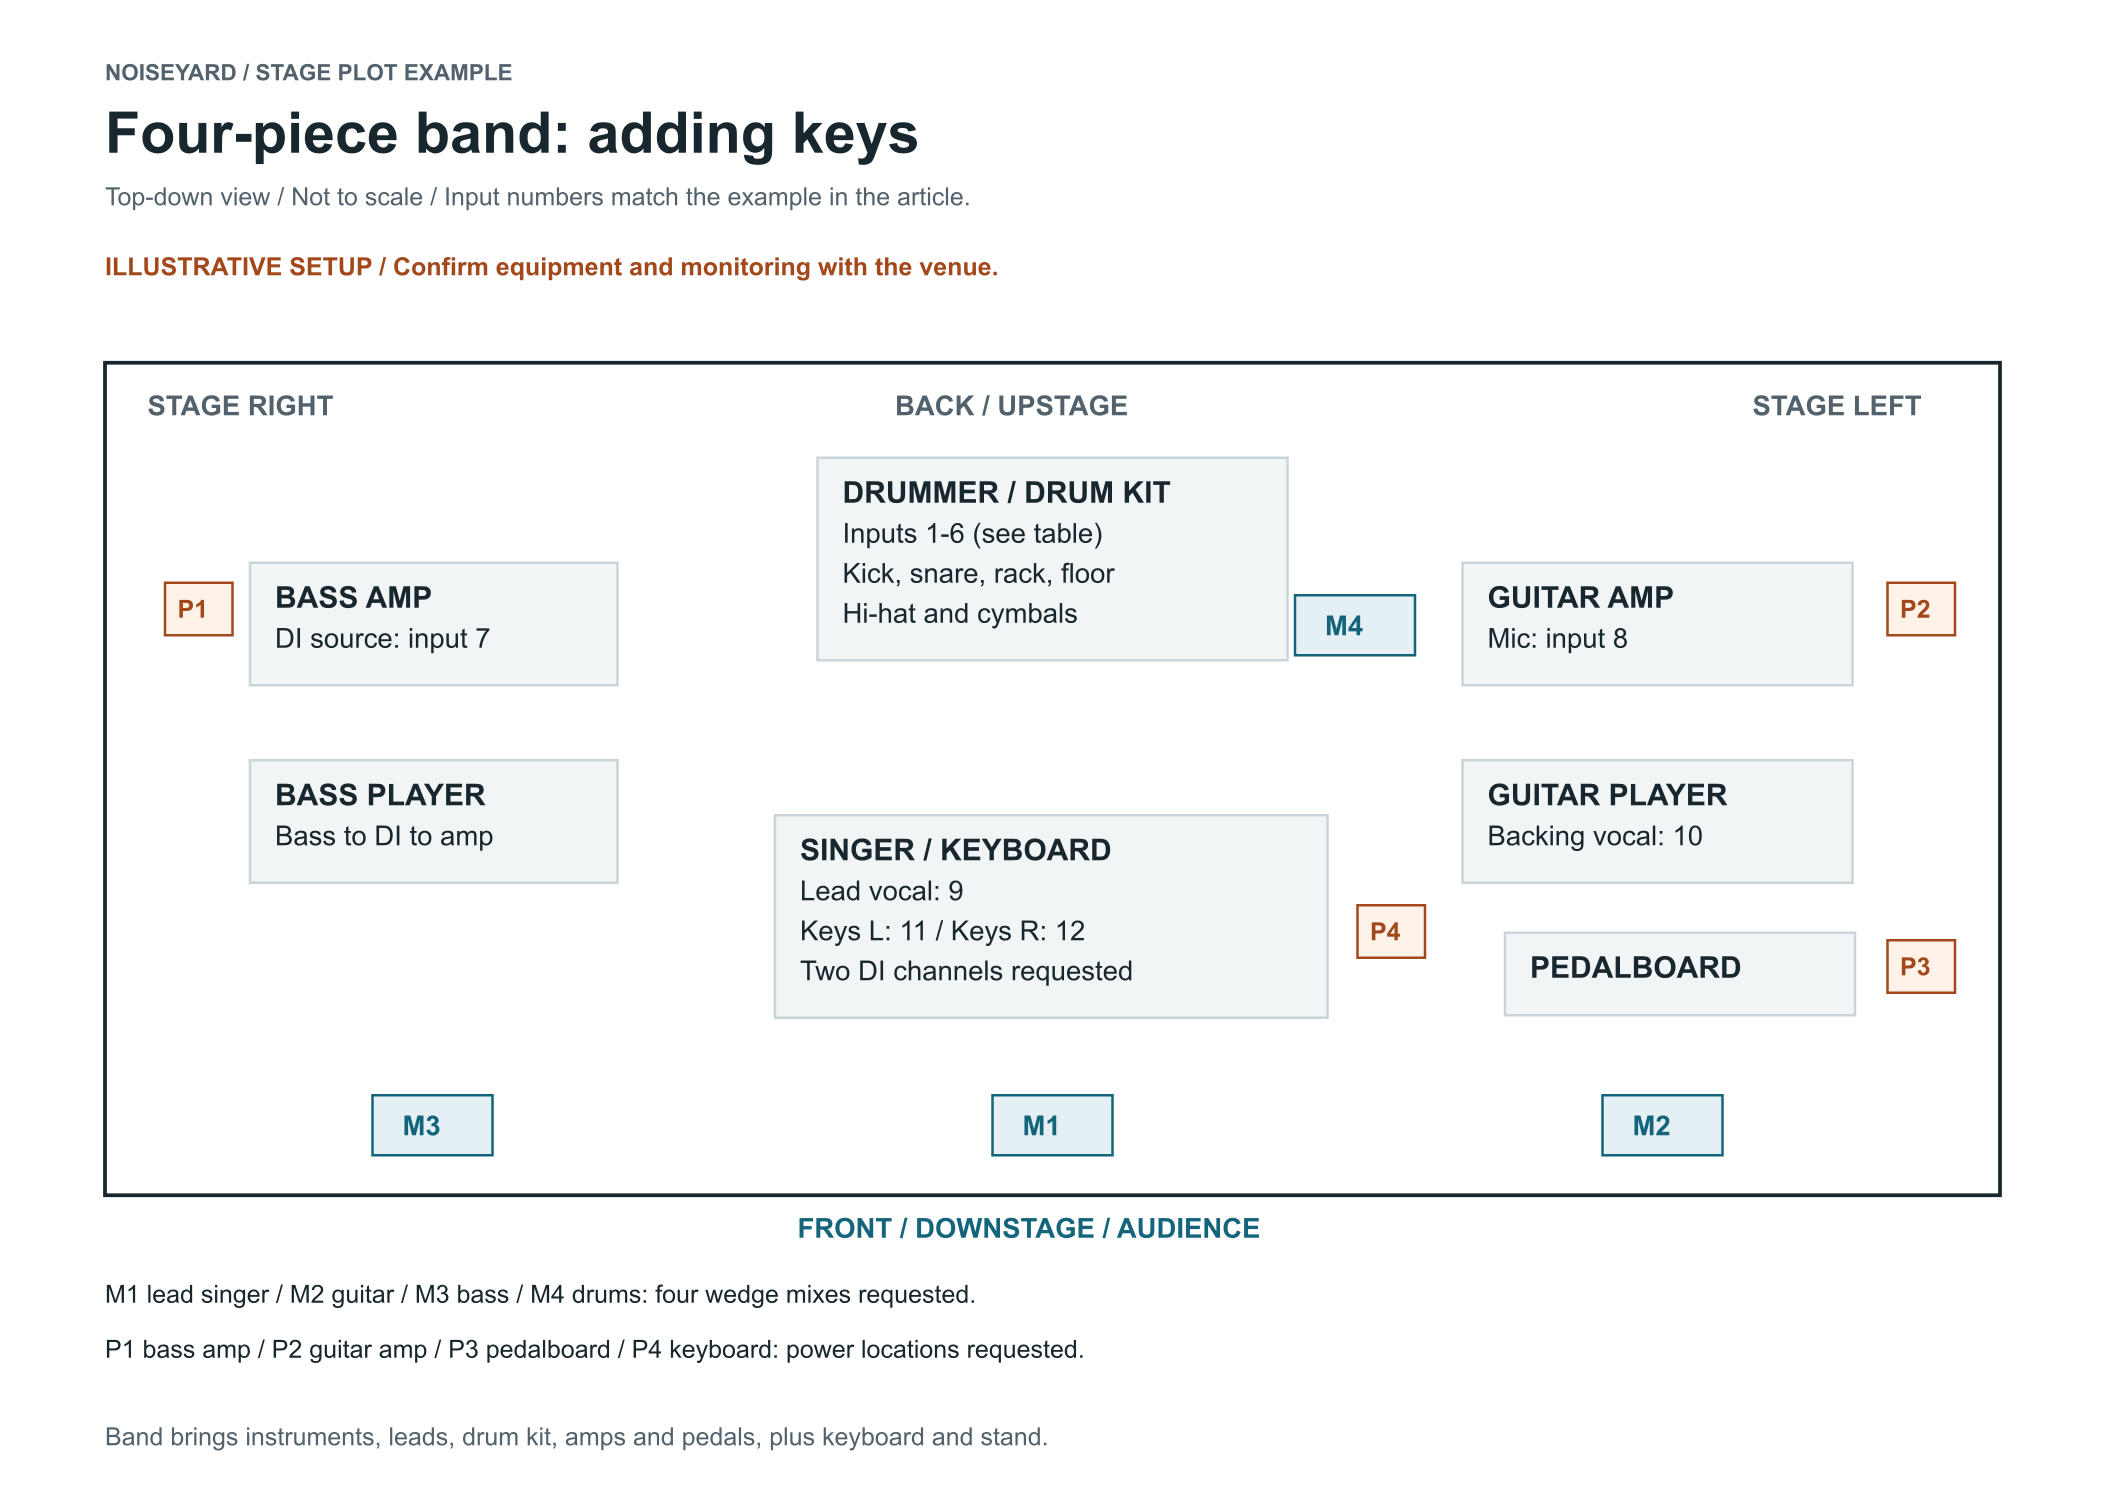
The drawing now shows the keyboard at the singer's position, labels inputs 11 and 12, and adds P4 for its power. The singer's vocal microphone remains input 9. The monitor notes also add keys to M1.
The band brings the keyboard, stand and leads to the DIs. The venue is asked to provide the two extra DI channels, with the connections and available inputs confirmed in advance. If you agree to use a mono output, revise the documents to show that setup.
The revised setup has twelve inputs, three DI channels including the bass, and four requested power locations. Check those totals against the drawing and equipment notes before sending the updated version.
Send the version the venue needs
Ask the production contact for their preferred format and deadline. They may have a form to complete. If they accept your own documents, a readable PDF preserves the layout; send the editable input list too if requested.
Put the artist, show, update date and technical contact on every page. Name the file clearly, for example BandName_Venue_StagePlot_Inputs_2026-10-12.pdf, with the update date at the end. A venue should be able to identify an attachment after it has been saved outside your email.
For several shows, keep a standard version for each lineup and a record of venue-specific agreements. Label a changed version with the relevant show so it does not replace the setup for every date. The wider routing and budgeting tasks are covered in our DIY tour booking guide.
Before sending, check the documents together:
-
Each listed source has a clear location, and each sound source drawn has its required input entries.
-
Vocal microphones and any stereo sources are fully accounted for.
-
Monitor users, requested mixes and power locations are labelled.
-
Equipment requests are distinguishable from confirmed supplies.
-
The contact details, lineup and version are current.
Open the exported PDF and inspect every page. Check small text, missing rows and anything clipped at the edges. If the setup changes after you send it, contact the production person directly and identify what changed. Updating a file silently may leave them preparing from an earlier copy.
Keep your technical information current
If you maintain a musician website or EPK, add a brief technical summary beside your contact information. A returning venue can check your usual lineup and find the person handling production.
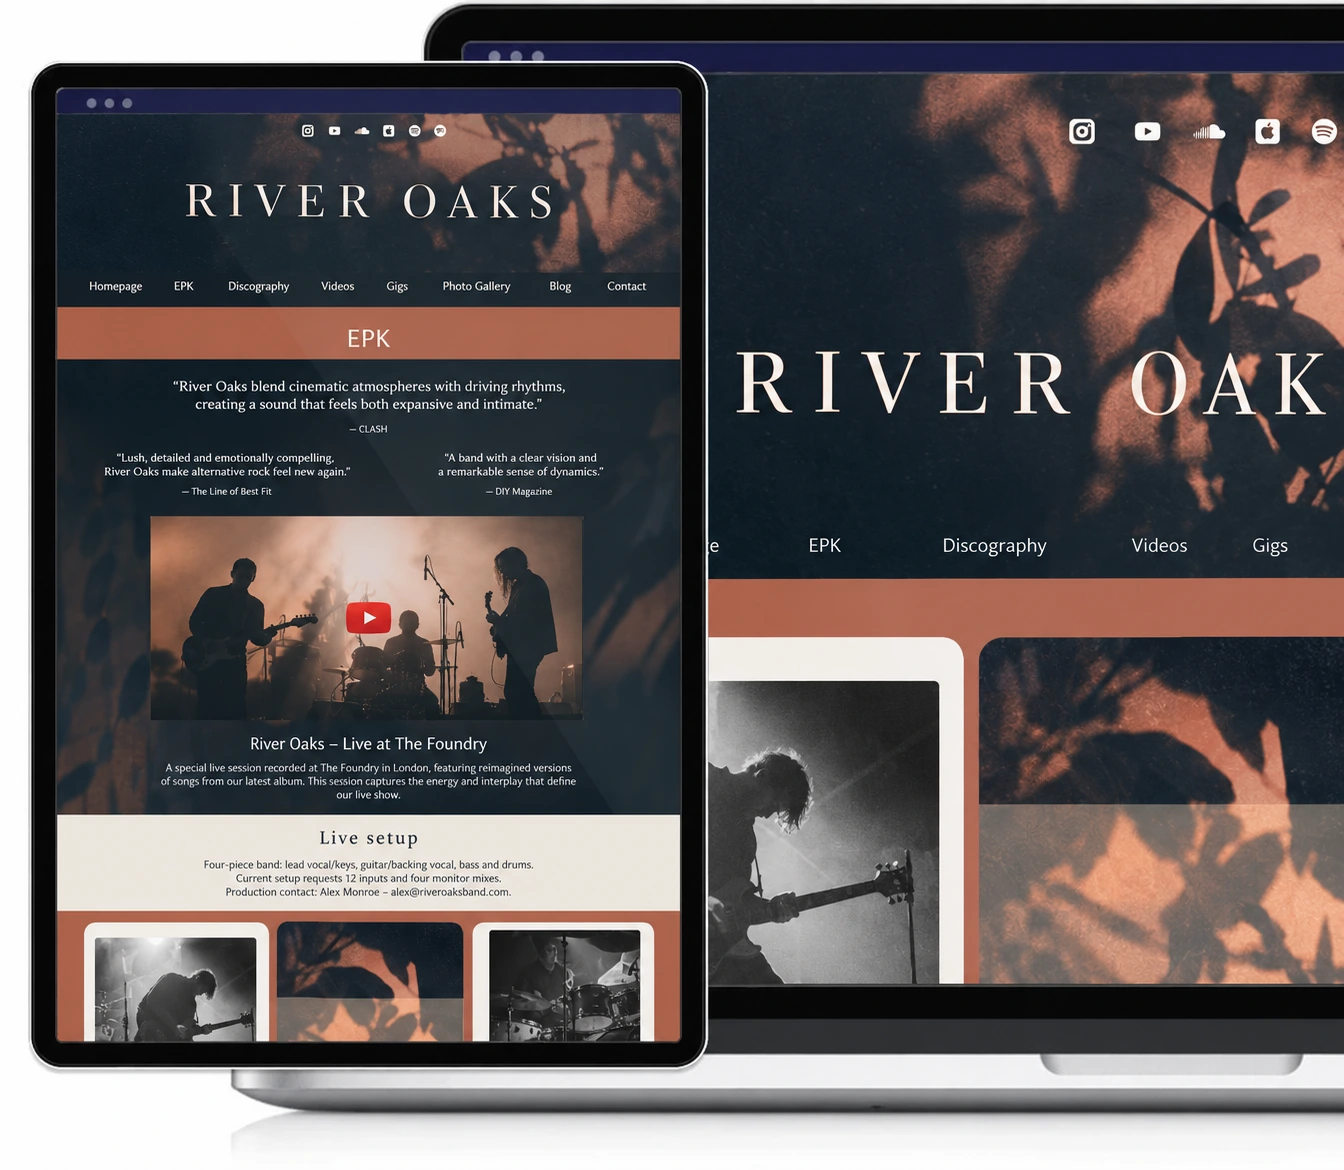
For the keyboard version above, the summary could read: “Four-piece band: lead vocal/keys, guitar/backing vocal, bass and drums. Current setup requests 12 inputs and four monitor mixes. Production contact: [name and email].” Update this text if you change the lineup or perform with a different setup.
In Noiseyard, you can use a Text Section on your EPK for this summary and your production contact. Our EPK setup guide covers preparing the rest of the page.
After editing, open your musician website on your phone and check that the summary and contact details are current.
Build your own musician website
Music player, store, EPK, and mailing list, all built in. Start your 30-day free trial, cancel anytime.
Common questions
Can I draw a stage plot by hand?
Yes. Use clear labels and scan or photograph the page squarely, with enough light to read everything. Open the resulting file and check the numbers. Follow the venue's format requirements if it asks you to complete its own form.
Does a solo musician need an input list?
If the venue requests one, list your setup even when it only needs a vocal microphone and an instrument connection. A solo act using loops, keys or backing tracks may have several inputs. Include what you use during the performance.
What if I don't know which microphones to request?
Describe the source and how you perform: a sung vocal, an acoustic guitar with a pickup, or a guitar amp, for example. Ask the venue's engineer what they can provide. Specify a particular model only when you have a reason to need it, and agree any alternatives.
Should I send this with my first booking email?
Follow the recipient's instructions. Send technical details early if they need them to assess whether they can accommodate your act. Otherwise, provide them when requested during planning. Our EPK pitching guide covers the initial booking approach.
Do I need a website to share my stage plot?
No. You can send the documents directly or complete the venue's form. An EPK can also give a returning venue your usual lineup, a brief technical summary and the right person to contact.